思路和框架 正常的接口测试流程
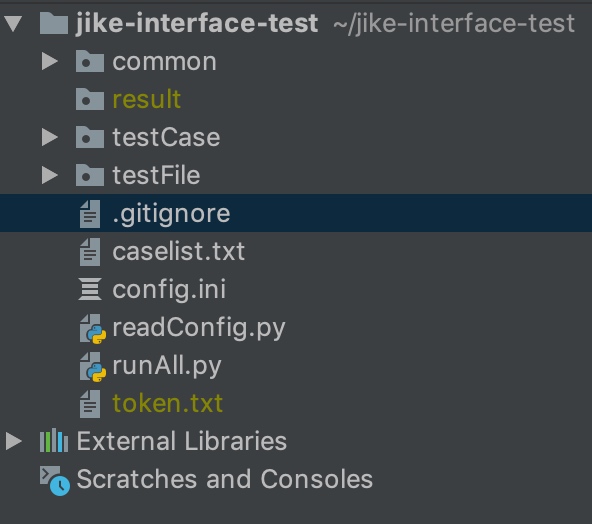
common:存放一些共通的方法
result:执行过程中生成的文件夹,里面存放每次测试的结果
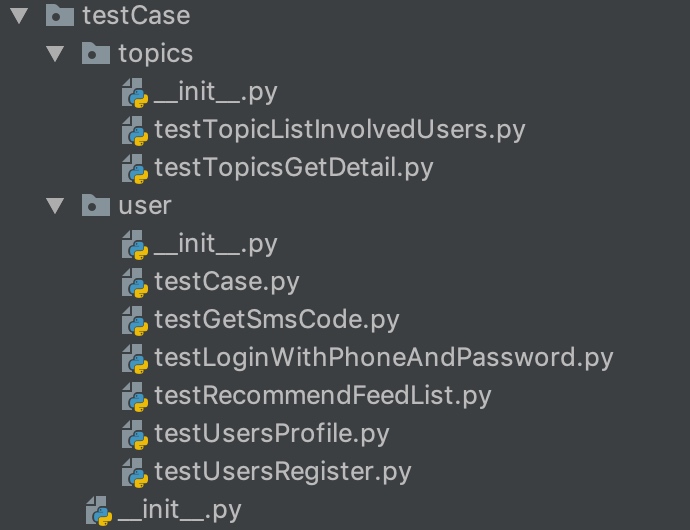
testCase:用于存放具体的测试case
gitignore:Git忽略提交规则(不是必要)
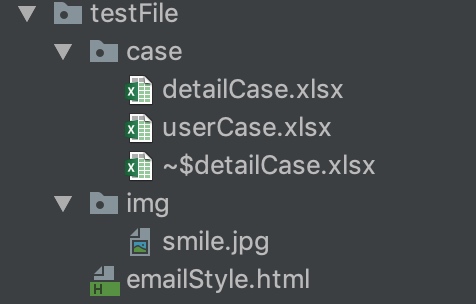
testFile:存放测试过程中用到的文件,包括上传的文件,测试用例以及数据库的sql语句
caselist:txt文件,配置每次执行的case名称
config:配置一些常量,例如数据库的相关信息,接口的相关信息等
readConfig: 用于读取config配置文件中的内容
runAll:用于执行case
token.txt:本地换持有token
config 配置一些常量,例如数据库的相关信息,接口的相关信息等
1
2
3
4
5
6
7
8
9
10
11
12
13
14
15
16
17
18
19
20
21
22
23
24
[EMAIL] mail_host = smtp.qq.commail_user = xxx@qq.commail_pass = xxxmail_port = 465 mail_replyto = xxx@ruguoapp.comsender = xxx@qq.comreceiver = xxx@qq.comsubject = "测试报告" content = "今天测试一下python是否可以发送邮件成功。" user = xxon_off = on [HTTP] scheme =httpsbase_url =xxxtimeout = 10.0 [DATABASE] host = localhostusername = rootpassword = rootport = 3306 database = test
readConfig.py 用来读取config配置文件中的内容,定义的方法,根据名称取对应的值
1
2
3
4
5
6
7
8
9
10
11
12
13
14
15
16
17
18
19
20
21
22
23
24
25
26
27
28
29
30
31
32
33
34
35
36
37
38
import os import codecs import configparser ProDir = os .path .split(os .path .realpath(__file__))[0 ] # 该文件的绝对路径 configPath = os .path .join(ProDir, "config.ini" ) class ReadConfig: def __init__(self ): fd = open (configPath) data = fd.read () # remove BOM if data[:3 ] == codecs.BOM_UTF8: data = data[3 :] file = codecs.open (configPath, "w" ) file.write (data) file.close () fd.close () self .cf = configparser.ConfigParser() self .cf.read (configPath) def get_email(self , name): value = self .cf.get("EMAIL" , name) return value def get_http(self , name): value = self .cf.get("HTTP" , name) return value def get_db(self , name): value = self .cf.get("DATABASE" , name) return value if __name__ == '__main__' : # 测试一下,我们读取配置文件的方法是否可用 print ('HTTP中的base_url值为:' , ReadConfig().get_http('base_url' ))
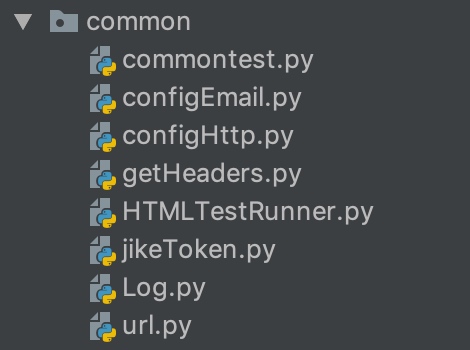
common 存放一些共通的方法
Log 对于这个log文件呢,我给它单独启用了一个线程,这样在整个运行过程中,我们在写log的时候也会比较方便,看名字大家也知道了,这里就是我们对输出的日志的所有操作了,主要是对输出格式的规定,输出等级的定义以及其他一些输出的定义等等。总之,你想对log做的任何事情,都可以放到这里来。
1
2
3
4
5
6
7
8
9
10
11
12
13
14
15
16
17
18
19
20
21
22
23
24
25
26
27
28
29
30
31
32
33
import os import logging import threading localReadConfig = readConfig.ReadConfig() class Log: logging.basic Config() def __init__(self ): global log Path, resultPath, path, logger_name path = readConfig.ProDir resultPath = os .path.join(path, "result" ) logger_name = 'logs' if not os .path.exists(resultPath): os .mkdir(resultPath) log Path = os .path.join(resultPath, str(datetime.now().strftime("%Y%m%d%H%M%S" ))) if not os .path.exists(log Path): os .mkdir(log Path) self .logger = logging.getLogger(logger_name) self .logger.set Level(logging.INFO) handler = logging.FileHandler(os .path.join(log Path, "output.log" )) formatter = logging.Formatter( '[%(asctime)s] <%(levelname)s> %(message)s') handler.set Formatter(formatter) self .logger.addHandler(handler)
现在,我们创建了上面的Log类,在__init__初始化方法中,我们进行了log的相关初始化操作。具体的操作内容,注释已经写得很清楚了,这样,log的基本格式已经定义完成了,至于其他的方法,就靠大家自己发挥了,毕竟每个人的需求也不同,我们就只写普遍的共用方法啦。接下来,就是把它放进一个线程内了,请看下面的代码:
1
2
3
4
5
6
7
8
9
10
11
12
13
14
15
class MyLog: log = None mutex = threading.Lock() # 多线程 def __init__(self ) : pass @staticmethod def get_log() : if MyLog . MyLog .() # 获取互斥锁后,进程只能在释放锁后下个进程才能进来 MyLog .Log() MyLog .() # 互斥锁必须被释放掉 return MyLog .
configHttp.py 配置接口文件,主要内容如下
1
2
3
4
5
6
7
8
9
10
11
12
13
14
15
16
17
18
19
20
21
22
23
24
25
26
27
28
29
30
31
32
33
34
35
36
37
38
39
40
41
42
43
44
45
46
47
48
49
50
51
52
53
54
55
56
57
58
59
60
61
62
63
64
65
66
67
68
69
70
71
72
73
74
75
76
77
78
79
80
81
82
83
84
85
86
87
88
89
90
91
92
93
94
95
96
97
98
99
100
101
102
103
104
105
106
107
108
109
110
111
112
113
114
115
116
117
import requestsimport readConfig as readConfigfrom common import getHeadersfrom common.Log import MyLog as LoglocalReadConfig = readConfig.ReadConfig() class ConfigHttp : def __init__ (self ): global scheme, host, timeout scheme = localReadConfig.get_http("scheme" ) host = localReadConfig.get_http("base_url" ) timeout = localReadConfig.get_http("timeout" ) self.log = Log.get_log() self.logger = self.log.get_logger() self.params = {} self.headers = None self.data = {} self.url = None self.files = None def set_url (self, url ): self.url = scheme +'://' +host+url def set_headers (self ): """ set headers """ self.headers = getHeaders.get_headers() def set_local_headers (self ): """ set local headers """ self.headers = getHeaders.local_headers() def set_params (self, param ): """ set params :param param: :return: """ self.params = param def set_data (self, data ): """ set data :param data: :return: """ self.data = data def get (self ): """ defined get method :return: """ try : response = requests.get(self.url, headers=self.headers, params=self.params, data=self.data) if response.status_code == 200 : return response elif response.status_code == 401 : getHeaders.refresh_tokens() response = requests.get(self.url, headers=self.headers, params=self.params, data=self.data) return response else : return response except TimeoutError: self.logger.error("Time out!" ) return None def post (self ): """ defined post method :return: """ try : response = requests.post(self.url, headers=self.headers, params=self.params, data=self.data) if response.status_code == 200 : return response elif response.status_code == 401 : getHeaders.refresh_tokens() response = requests.post(self.url, headers=self.headers, params=self.params, data=self.data) return response else : return response except TimeoutError: self.logger.error("Time out!" ) return None def post_with_file (self ): """ defined post method :return: """ try : response = requests.post(self.url, headers=self.headers, data=self.data, files=self.files, timeout=float (timeout)) return response except TimeoutError: self.logger.error("Time out!" ) return None def post_with_json (self ): """ defined post method :return: """ try : response = requests.post(self.url, headers=self.headers, json=self.data, timeout=float (timeout)) return response except TimeoutError: self.logger.error("Time out!" ) return None
用python自带的requests来进行接口测试,,拿get和post两个方法来说吧。(平时用的最多的就是这两个方法了,其他方法,大家可以仿照着自行扩展)
对于requests提供的get方法,有几个常用的参数:
举个栗子:
1
2
3
4
5
url =‘http://api.shein.com/v2/member/logout’header={‘content-type’: application/x-www-form-urlencoded} param={‘user_id’: 123456,‘email’: 123456@163.com} timeout =0.5requests.get(url, headers =header, params =param, timeout =timeout)
post方法
常用的返回值的操作。
举个栗子:
1
2
3
4
5
url =‘http://api.shein.com/v2/member/login’header={‘content-type’: application/x-www-form-urlencoded} data={‘email’: 123456@163.com,‘password’: 123456} timeout =0.5requests.post(url, headers =header, data =data, timeout =timeout)
以上这些,就是常用的方法啦,大家可自行取之。
关于失败请求抛出异常,我们可以使用“raise_for_status()”来完成,那么,当我们的请求发生错误时,就会抛出异常。在这里提醒下各位朋友,如果你的接口,在地址不正确的时候,会有相应的错误提示(有时也需要进行测试),这时,千万不能使用这个方法来抛出错误,因为python自己在链接接口时就已经把错误抛出,那么,后面你将无法测试期望的内容。而且程序会直接在这里当掉,以错误来计。
common.py 内容如下
1
2
3
4
5
6
7
8
9
10
11
12
13
14
15
16
17
18
19
20
21
22
23
24
25
26
27
28
29
30
31
32
33
34
35
36
37
38
39
40
41
42
43
44
45
46
47
48
49
50
51
52
53
54
55
56
57
58
59
60
61
62
63
64
65
66
67
68
69
70
71
72
73
74
75
76
77
import readConfigimport osfrom xlrd import open_workbookfrom common import configHttpfrom common.Log import MyLog as Logimport jsonlocalReadConfig = readConfig.ReadConfig() testFilePath = os.path.join(readConfig.ProDir,'testFile' ) localConfigHttp = configHttp.ConfigHttp() log = Log.get_log() logger = log.get_logger() caseNo = 0 def get_value_from_return_json (response_json, name1, name2 ): """ get value by key :param response_json: :param name1: :param name2: :return: """ group = response_json[name1] value = group[name2] return value def get_value_dict_keys (dict """ :param dict: :return: """ list = [i for i in dict ] return list def show_return_msg (response ): """ show msg detail :param response: :return: """ url = response.url msg = response.text code=str (response.status_code) print("请求地址:" +url) print("请求结果:" +code) print("请求返回值:" +'\n' +json.dumps(json.loads(msg), ensure_ascii=False , sort_keys=True , indent=4 )) def get_xls_case (xls_name, sheet_name ): """ get interface data from xls file :return: """ cls = [] xls_path = os.path.join(testFilePath, 'case' , xls_name) file = open_workbook(xls_path) sheet = file.sheet_by_name(sheet_name) rows = sheet.nrows for i in range (rows): if sheet.row_values(i)[0 ] != u'case_name' : cls.append(sheet.row_values(i)) return cls
上面就是common主要内容。主要利用xlrd来操作excel文件,注意啦,我们是用excel文件来管理测试用例的。
configEmail.py 发送邮件
1 2 3 4 5 6 7 8 9 10 11 12 13 14 15 16 17 18 19 20 21 22 23 24 25 26 27 28 29 30 31 32 33 34 35 36 37 38 39 40 41 42 43 44 45 46 47 48 49 50 51 52 53 54 55 56 57 58 59 60 61 62 63 64 65 66 67 68 69 70 71 72 73 74 75 76 77 78 79 80 81 82 83 84 85 86 87 88 89 90 91 92 93 94 95 96 97 98 99 100 101 102 103 104 105 106 107 108 109 110 111 112 113 114 115 116 117 118 119 120 121 122 123 124 125 126 127 128 129 130 131 132 133 134 135 136 137 138 139 140 141 142 import osimport smtplibfrom email.mime.text import MIMETextfrom email.header import Headerfrom email.mime.application import MIMEApplication from email.mime.multipart import MIMEMultipartfrom email.mime.image import MIMEImagefrom datetime import datetimeimport threadingimport readConfig as readConfigfrom common.Log import MyLoglocalReadConfig = readConfig.ReadConfig() class Email : def __init__ (self ): global host, user, password, port, sender, title,receivers sender = localReadConfig.get_email("sender" ) receivers = ['8463299@qq.com' ] host = localReadConfig.get_email("mail_host" ) port = localReadConfig.get_email("mail_port" ) user = localReadConfig.get_email("mail_user" ) password = localReadConfig.get_email("mail_pass" ) title = localReadConfig.get_email("subject" ) date = datetime.now().strftime("%Y-%m-%d %H:%M:%S" ) self.subject = "接口测试报告" + " " + date self.log = MyLog.get_log() self.logger = self.log.get_logger() self.msg = MIMEMultipart('related' ) def config_header (self ): """ defined email header include subject, sender and receiver :return: """ self.msg['Subject' ] = Header(self.subject) self.msg['From' ] = Header(sender) self.msg['To' ] = Header(str (";" .join(receivers))) def config_content (self ): """ write the content of email :return: """ self.config_file_html_img() self.config_file() def config_file_html_img (self ): file_path = os.path.join(readConfig.ProDir, 'testFile' , 'emailStyle.html' ) with open (file_path, 'rb' ) as fp: msg_text = MIMEText(fp.read(), 'html' , 'utf-8' ) self.msg.attach(msg_text) image2_path = os.path.join(readConfig.ProDir, 'testFile' , 'img' , 'smile.jpg' ) self.msg.attach(self.add_image(image2_path, '<image2>' )) def config_file_html (self ): report_file_path = self.log.get_report_file_path() with open (report_file_path, encoding='utf-8' ) as f: email_body = f.read() self.msg = MIMEMultipart() self.msg.attach(MIMEText(email_body, 'html' , 'utf-8' )) def config_file (self ): if self.check_file(): report_folder_path = self.log.get_result_folder_path() filename = [os.path.join(report_folder_path, 'output.log' ), os.path.join(report_folder_path, 'report.html' )] for tmp in filename: with open (tmp, 'rb' ) as f: attach_files = MIMEApplication(f.read()) attach_files.add_header('Content-Disposition' , 'attachment' , filename=tmp) self.msg.attach(attach_files) def add_image (self,src, img_id ): with open (src, 'rb' ) as f: msg_image = MIMEImage(f.read()) msg_image.add_header('Content-ID' , img_id) return msg_image def check_file (self ): """ check test report :return: """ report_path = self.log.get_report_file_path() if os.path.isfile(report_path) and not os.stat(report_path) == 0 : return True else : return False def send_email (self ): """ send email :return: """ global smtp self.config_content() self.config_header() try : smtp = smtplib.SMTP_SSL(host,port) smtp.login(user, password) smtp.sendmail(sender, receivers, self.msg.as_string()) self.logger.info("测试报告已通过电子邮件发送给开发人员" ) except Exception as ex: self.logger.error(str (ex)) return "邮件发送失败" finally : smtp.quit() class MyEmail : email = None mutex = threading.Lock() def __init__ (self ): pass @staticmethod def get_email (): if MyEmail.email is None : MyEmail.mutex.acquire() MyEmail.email = Email() MyEmail.mutex.release() return MyEmail.email if __name__ == "__main__" : email = MyEmail.get_email()
HTMLTestRunner.py HTMLTestRunner.py这个文件从网上下载的,大神写好的,用于生成html格式的测试报告
runAll.py 这是整个框架运行的入口
1
2
3
4
5
6
7
8
9
10
11
12
13
14
15
16
17
18
19
20
21
22
23
24
25
26
27
28
29
30
31
32
33
34
35
36
37
38
39
40
41
42
43
44
45
46
47
48
49
50
51
52
53
54
55
56
57
58
59
60
61
62
63
64
65
66
67
68
69
70
71
72
73
74
75
76
77
78
79
80
81
82
83
84
85
86
87
88
89
90
91
92
93
import osimport unittestfrom common.Log import MyLog as Logimport readConfig as readConfigfrom common import HTMLTestRunnerfrom common.configEmail import MyEmaillocalReadConfig = readConfig.ReadConfig() class AllTest : def __init__ (self ): global log, logger, resultPath, on_off log = Log.get_log() logger = log.get_logger() resultPath = log.get_report_file_path() on_off = localReadConfig.get_email("on_off" ) self.caseListFile = os.path.join(readConfig.ProDir, "caseList.txt" ) self.caseFile = os.path.join(readConfig.ProDir, "testCase" ) self.caseList = [] self.email = MyEmail.get_email() def set_case_list (self ): """ set case list :return: """ fb = open (self.caseListFile) for value in fb.readlines(): data = str (value) if data != '' and not data.startswith("#" ): self.caseList.append(data.replace("\n" , "" )) fb.close() def set_case_suite (self ): """ set case suite :return: """ self.set_case_list() test_suite = unittest.TestSuite() suite_module = [] for case in self.caseList: case_name = case.split("/" )[-1 ] print(case_name + ".py" ) discover = unittest.defaultTestLoader.discover(self.caseFile, pattern=case_name + '.py' , top_level_dir=None ) suite_module.append(discover) if len (suite_module) > 0 : for suite in suite_module: for test_name in suite: test_suite.addTest(test_name) else : return None return test_suite def run (self ): """ run test :return: """ try : suit = self.set_case_suite() if suit is not None : logger.info("================================== 测试开始 ==================================" ) fp = open (resultPath, 'wb' ) runner = HTMLTestRunner.HTMLTestRunner(stream=fp, title='即刻接口测试报告' , description='用例执行情况' ) runner.run(suit) fp.close() else : logger.info("没有需要测试的案例" ) except Exception as ex: logger.error(str (ex)) finally : if on_off == 'on' : self.email.send_email() elif on_off == 'off' : logger.info("不向开发人员发送报告电子邮件" ) else : logger.info("未知状态" ) logger.info("================================== 测试结束 ==================================" ) if __name__ == '__main__' : obj = AllTest() obj.run()
上面贴出了runAll里面的主要部分,首先我们要从caselist.txt文件中读取需要执行的case名称,然后将他们添加到python自带的unittest测试集中,最后执行run()函数,执行测试集。
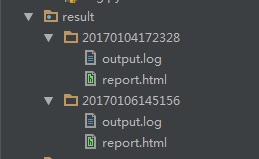
result result文件夹会在首次执行case时生成,并且以后的测试结果都会被保存在该文件夹下,同时每次测试的文件夹都是用系统时间命名,里面包含了两个文件,log文件和测试报告
testCase testCase文件夹下,存放我们写的具体的测试case。注意,所有的case名称都要以test开头来命名,因为unittest在进行测试时会自动匹配testCase文件夹下面所有test开头的.py文件
testFile testFile文件夹下,放置我们测试时用来管理测试用例的excel文件和用于数据库查询的sql语句的xml文件。
caselist.txt 凡是没有被注释掉的,都是要被执行的case名称啦。在这里写上你要执行的case名称就可以啦。
参考https://my.oschina.net/u/3041656/blog/820023?p=7 https://gitee.com/null_534_6629/interfacetest/tree/master